Saturday, June 27, 2009

Super Solid Colors


I dyed over 40 sample squares on Thursday, Whew!

I started the rinse out Friday morning, and had to leave the rest until today. The last few are having their final soak as I type.

First, the single colors...


I already tested Cerulean and Fuchsia, so today I did Fire Red, Lemon Yellow, Turquoise, and Better Black. These are all the Dharma Trading Company color names. I capitalize them to indicate they are proper names. Soon I'll put all the color reference stuff in its own post.


Aren't they cute!


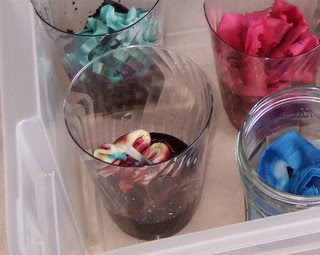
These are still wet and only partially rinsed out. These are 200%, 100%, 50%, 16%, 4%, and 2%, where 100% is ½ / 1 / 1½ teaspoons of red / blue / yellow-or-black dye per 1/4 yard of fabric. These are 5"x5" squares, crammed into a 2 oz cup holding about 1 oz of liquid.

Ooh those are some scary colors! The Lemon Yellow looks like it might bite, and the Turquoise could smack you right across the room. But those are primaries, so of course they scream and yell. Modulating their voices is my job.

And they aren't as bright once they're thoroughly rinsed. The Turquoise and the Better Black took the biggest hit.


I leafed through my old copy of Dye Painting (no longer in print), by Ann Johnston. She says that turquoise always washes out, making the color untrue as you paint with it. Any black that contains turquoise will have the same problem. Looking at the Cerulean before & after in this post, there's some washout too, especially in the really saturated samples. I suspect that the low-immersion dye method may leave more unreacted dye in the fabric than other methods.

Next time I'm going to keep trim off some small samples before completely rinsing.

And look what the heat of the iron does to the yellow samples...


The pair on the left have been ironed on one half and are still hot. Happily, the color goes back to normal once the fabric has cooled, as you see on the right.

Next post will show the mixed colors and the space dye stuff.

Friday, June 26, 2009

Tie-Dye Breakfast Product


This was at the end of the dye session. I folded a bit fabric and tied it loosely with a small strip of fabric Instead of squirting in color, I set the little bundle on top of some fabric in a cup of red dye.

The lower side got dark with dye...


Some of the upper side stayed white.


Opening the folds.


Spreading it flat.

Unfold...

...and unfold again.

It's a sizzling strip of tie-dye bacon!

Update two days later... Look how boring it turned out to be!


The other fabric in that cup came out like this:


I named the color tired wine. I would have thought some of that red color would be present in the bacon piece. Maybe too much of the dye had already reacted by the time I set the bacon piece on top?

Weird Gooey Fuchsia Stuff


I've been dyeing bits of fabric all day and have no business blogging this late, but will you take look at this? I mixed up some Fuchsia dye yesterday afternoon, used it for some samples, and left out the extra to play with today. It was at room temperature, so I knew it would have lost some oomph, but figured it would still provide some color mixing fun. The stuff seemed fine as late as 11pm tonight, but then as I was cleaning up, I noticed this weird gunky stuff stuck to the inside of the jar. What's that about?


It's gelatinous, rubbery. What makes this happen? I was in full experimentation mode. Did I contaminate the jar with something??? With a little encouragement it washed out OK, but it broke up rather than dissolve. Here's the rinse water--lots of little floaties:


While we're here, take a look at how the fuchsia samples washed out...


These are still wet, and these are some seriously frightening shades of pink. These are 200%, 100%, 50%, 16%, 4%, and 2%.


The mottling is much stronger than for the Cerulean set. Is this a characteristic of the Fuchsia? Or did I just cram the fabric in tighter? I like it, and see great possibilities here for overdyeing.


In the last hour the studio looked like this:


And like this...


Time to call it a night. Tomorrow I'll go pick up Sparky at his grandparents' house. I hope to do some quick rinsing out before it's time to leave!!!

Wednesday, June 24, 2009

Beautiful, Beautiful Blue


Time to wash out the Cerulean test squares! I just love how they look in the sink!

It makes me SO happy!


Here are the squares when they were wet...


And here they are dry...


The steps going up are an 80% progression: the amount of dye in each square is 80% of what's in the previous square. The steps going down are a 50% progression. One of my goals with this test was to see how much dye I need to get a really dark color. I'd like to go darker than this. For the next colors I'll try a 200% as well.

The steps you see above are 100%, 80%, 64%, 50%, 40%, 33%, 16%, 8%, 4%, 2%.

I mixed 1/4 teaspoon of dye with 80 ml (milliliters) of pre-mix (water, urea, and water softener). 10 ml of this will dye a 5"x5" square to 100%, where 100% is 4t of (blue) dye per yard of quilting weight cotton. I also added 1/2 teaspoon of my soda ash solution (1 cup soda ash per gallon of water) to each itty-bitty dye bath.

I need to find out whether I need urea in the pre-mix. Is that just for painting with dye? Does it do anything in a dye-bath?

* * *

I got some more equipment yesterday. At a pharmacy that does compounding (making up formulations of medicine) I got a bunch of syringes for measuring in milliliters. I used them today and they work great.

The sizes are 1, 10, 30, and 60ml, and cost between 75 cents and $2 each. The tiny ones I've had for a while. The vet sent me home with those filled with kitty pain killer and I held onto them.

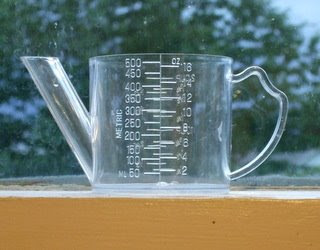
I got a bunch of stuff (colanders, bowls, towels) at Goodwill, and was especially happy to find two of these cups with good metric units.

What I really want are some graduated cylinders and proper beakers, but I'm trying to put the breaks on spending for a bit.

I had hoped to test ALL my other colors today, but only got to Fuchsia. I'm doing 200%, 100%, 50%, 16%, 4%, and 2%.

For the 200% square I had planned to use 20 ml of my standard solution but, silly me, that won't fit in the cup and I'd already diluted the dye. So I cut the fabric square in half.


I'm also doing some initial tests on dye painting. Here is some fabric soaked in soda ash solution, and I was attempting a 50% progression. I don't think I was mixing it very evenly.


I had to wrap my head around dye amounts for dye-painting as opposed to those for a dye bath. For the dye paint, it's how many little grains of dye vs. how much water. For a dye bath it's how many grains of dye vs. how many square inches of fabric in the bath. (Well technically it depends on grams of each, but whatever.) In a dye bath the amount of water (within reason) doesn't matter, but with paint more water means a paler mark.

For full-strength dye-paint I'm going to try mixing 1/4 teaspoon of dye with either 30 ml (for red dyes), 15 ml (for blue dyes), or 10 ml (for yellow or black dyes) of water. This matches the relative concentrations of different colors that I'm using in dye baths.

I left this sample out for about an hour before I remembered I have to keep it wet for the dye to react! I sprayed on a little water and covered it all up. As I wrote this and uploaded the picture, I realized I have paper, not plastic underneath it, no doubt sucking the moisture away from the fabric! I'll fix that before I call it a night.

Monday, June 22, 2009

First DyeTest!!!


Despite limited sleep and a late start, I did some actual dyeing today! I pushed myself a bit, because I wanted something to be curing overnight.

I got the chemicals ready...


I soaked my labeled bits of fabric in soda ash solution...


I planned and labeled and set out the tools...


And did it!


These are 1 ounce cups, each holding a crumpled 5"x5" piece of muslin.

A quarter of a quarter of a fat quarter would be 1/64th of a yard, and measure 4 1/2" x 5 1/2". So I treat 5"x5" as 1/64th of a yard. Once I make a square in a color I like, I plan to double and double the dye recipe to repeat the color on a larger piece. I'm sure the larger dye bath will affect the outcome, but it's a start. I'm trying for maximum color experiments for minimum dye & fabric.

First off, I want to test one color at a lot of different levels of saturation, to know roughly how much dye for how much oomph. I tested Cerulean, at ten different levels. Measuring out dye for all those levels was not as tedious as it might sound. I used a remove-and-replace method that I learned in my wool-dyeing days, which I'll describe another time.

As a starting point, I'm setting my standard 100% saturation at 1 teaspoon of dye per quarter yard. That's for the blue dyes. For the reds I'll use half that, and for yellows & blacks I'll use one and a half times.

I'm not at all clear whether to mix the dye powder with plain water, softened water, or urea & water. Our water isn't very hard, but how hard is hard? I decided to make up some pre-mix recommended for tie-dye (minus the kelp thickener): 1/2 gallon water, 2t Calgon, 2 cups of urea.

I also added some soda ash solution directly to the dye cups. My solution was 1 cup soda ash per gallon of water, and I added 1/2 teaspoon of it to each cup. Can that possibly make a difference? There's about that much solution still clinging to the soaked fabric!

I realize there are dye recipes out there to follow, but I just love to mix color. I want to get to know these dyes. With acrylic paints, I developed my own sense of the primaries: their relative strengths and how they interact (go easy on that phthalo blue!). It gave me that pleasing sense of control that frees a person to improvise. The idea of having that same freedom in coloring FABRIC...hubba-hubba!

Tomorrow I'll see what I've got with Cerulean Blue, then test four levels of all my other primary colors (Fuchsia, Fire Red, Lemon Yellow, Turquoise, and Better Black). And who knows what might happen with the leftover dye...

Stops and Starts


I guess I didn't sleep fast enough.

Last night about 10:15 the phone rang. That's late for me, and with both son and husband elsewhere, I was a little freaked, especially when my caller turned out to be a cop! Not calling about family, but about a friend. Driving through a green light, my friend Dr. Mavis was hit by another car running a red light. No major injuries, but she had to be checked out.

So I went to the hospital, hung out joking with Dr Mavis's Great Friend and her Surrogate Niece. Great Friend explained that kids have to be twelve to visit in the ER, so Surrogate Niece (age eleven) put on earrings and primped a bit so she would pass. She also brought an iPod. Once Dr. Mavis started to get really sick of waiting for a CT scan and wearing a neck brace and her knee was hurting, Surrogate Niece hooked her up to hear Harry Potter 7. Not quite Vicodin, but it helped.

I got back home about 1, then slept in. I saw Dr. Mavis again in the morning, and didn't even START in the studio until about 3.

Last night as I left for the hospital, with no idea of how long and how bored I would be there, I realized I had no hand work to bring! I hate that! When my energy is low, or life is rough, I stitch. What if something really awful happened and I had nothing ready to go!

So even before getting out the dye today, I got out the piecing I finished last week, and basted the top/batting/backing together for hand quilting.

It's going to be a pillow for Mom. I have been wanting to try the Storm at Sea pattern for a while. I had planned a wall hanging to go above her bed, that would look like this:


Since it would only be 44" wide, the pieces were getting pretty tiny. So I decided to sew a pillow at that scale and see if the tiny bits of fabric made me crazy.

The tiny bits of fabric made me crazy.

So I'm giving Mom the pillow, as a down payment, and will see about a different wall hanging later on. I might still make this design, but larger. And wouldn't it look great in some mottled, hand-dyed fabric?

Sunday, June 21, 2009

Let the Dyeing Begin


See that background fabric? It's white. And the piece in the middle? It's blue.

I made that happen.

The great big box from Dharma Trading Company arrived on Tuesday, and by Friday morning I had this! I am ga-ga in love with this little square of fabric. I've waited so long to make it! It's just a 5"x5" square, but it's the first dye I've put to use in ten years!

I was going to work with plain white fabric, but ran across this white-on-white print. You can see it in the background. The white ink on the fabric won't take the dye, making a subtle pattern bold. This is fiber reactive dye on cotton in the one mixed color I got, Periwinkle.

I must start out with big thanks to Melissa at Fabric Dyeing 101. Her cost- and time-efficient method for making a whole lotta mottled colors really got my juices flowing. I had planned to dye fat quarters in beer cups, like she does, but then noticed these paint cups I had bought for my son...


I discovered I can cram a 5"x5" square in these, which is 1/64th of a yard. Each cup holds 2 Tablespoons of liquid. A perfect way to test out colors and other variables. The screw-top lids make it easy to deal with one color at a time.

I pulled that fabric out of its little cup on Friday, and this is Sunday. I've got a series of color tests planned for tomorrow. The f
abric squares are cut and labeled. I'd better sleep fast!